Application Instructions For Installing the Decals...It's EASY!!!

Create a Family Sticker The Newest Decals
New Decals
Full Intensity Grafx Welcomes You View your shopping cart Cool Decals and Car Stickers
Vinyl Decal Information FAQ
This website is secure. Click to show LOGO and SSL certificate here.
SITE MAP
Full Intensity Grafx on Facebook Full Intensity Grafx on Instagram Full Intensity Grafx on Twitter Full Intensity Grafx on Google+ Full Intensity Grafx on Snapchat Full Intensity Grafx on Youtube Contact Full Intensity Grafx Full Intensity Grafx on LinkedIn

How-to Decal Instructions

find wally get 10% off orders over $20
Application Instructions
(NEW MSG: 2-1-2024)Can you believe it's GROUND HOG day tomorrow. I'll be updating the site today. Stay tuned for new vinyl colors. We are Full Intensity Grafx & CAR AUDIO! See our Facebook page for a chance to see your order being made. ONLINE ORDERS SHIP DAILY. With us you're not just a customer, YOU'RE FAMILY! Shipping now!
See our blog posts: Surprised her with graphics!Jun.7th.2020 | Ass FamilyFeb.12th.2020 | They did it!Jan.24th.2020 | Mess up my PAINT?Jan.21st.2020 | 5 Cool Decals!Jan.16th.2020 | Create Family StickersJan.13th.2020 |
See All
^ Hide this message to save screen space ^

Windshield Decal Instructions and Tips

Watch Instructional Videos to help with your Decal Application!

Apply a decal using the simple peel and stick method.Apply a decal using the simple peel and stick method.

Apply a family decal or any decal using the half and half method.Apply a family decal or any decal using the half and half method.

Apply a windshield decal using the half and half method.Apply a windshield decal using the half and half method.

Wet decal application method (Only for vehicle graphics and large solid design decals)Wet decal application method (Only for vehicle graphics and large solid design decals)

How to easily Remove a decal from glass.How to easily Remove a decal from glass.

How to apply vehicle graphics or any large graphic using the wet method.How to apply vehicle graphics or any large graphic using the wet method.

Applying a Full Color Family DecalApplying a Full Color Family Decal

Apply an In Loving Memory Decal to GlassApply an In Loving Memory Decal to Glass

Remove an In Loving Memory Decal from GlassRemove an In Loving Memory Decal from Glass


cold weather tips for your decals

1) Give decal a firm squeegee first. this
enables easy separation from wax
paper. Peel extra slow when decal is
cold.

2) SLIGHTLY heating with a blow dryer
may help is your having difficulty
separating the decal from wax paper.

3) Always clean glass VERY thoroughly with
rubbing alcohol only. NOT WINDEX!

4) Do not apply in temperatures below
50 degrees Fahrenheit. This has to do
with vinyl’s initial adhesion property.

5) Do not let snow stay on decal for
extended periods if possible. Gently
wipe away if you can.

6) In extreme cold weather put vehicle
inside if possible.

7) Don’t pour hot or warm water on
frozen decal. Don’t tamper with decal
when it’s frozen.


Faq for questions about your decals Decal Get Wrinkled in the mail? Click Here How to install a vinyl decal

Regular Decal instructions

A basic simple method for installing the vinyl decals...

noteUpon recieving your decal in the mail - unroll and layout flat. Lightly squeegee out any wrinkles caused by the shipping process.

1. Apply to the outside of a window or smooth painted surface. It's very important
to clean window or surface with rubbing alcohol not windex. Do not apply in direct
sunlight, apply in the shade. Do not apply if the tempurature outside is below 50 degrees. Also, trying the sample decal first will help if your unsure.


2. For larger decals some may prefer the wet installation. NOTE: The wet install works best
for solid decals without a lot of small pieces, or small text.
Wet window with a heavy
mist of water, remove paper backing from decal and wet the sticky side with a mist
of water also. Apply the decal to the wet surface. After it is in the desired place,
squeegee out the water with a plastic squeegee. (You could use an I.D. Card for this.)


3. For smaller decals you can apply dry. Peel off the white paper backing and apply
the sticky part to the glass or surface. Applying from one side to the other will
reduce air bubbles. Rub or squeegee on with a plastic squeegee. ( I.D. Cards work too)


4. Now, Just peel off the remaining plastic or paper application tape very slowly at
a sharp angle away from the decal. If the decal starts to come up as well rub it
again or squeegee more then try again patiently.


5. Air bubbles happen. They are a normal part of this type of decal. If you would like
you can try to remove them by popping them with a pin and rubbing them, but most
will go away on their own. Wrinkles can usually be massaged away with a heat gun.


6. Maintainance tips: Do not over wax vehicle graphics. Using windex to clean the
decals may fade them faster. Most decals will last for several years but there is no
guarantee as to how long they will actually last. Please see the Frequently Asked
Questions in our FAQ

Also see the F.A.Q. for more.


Exact Positioning Method

A method that requires more time and patience, but is still relatively easy. Apply the decal making sure it get it where you want it.

noteUpon recieving your decal in the mail - unroll and layout flat. Lightly squeegee out any wrinkles caused by the shipping process.

(also see pictures and step by step illustration below)

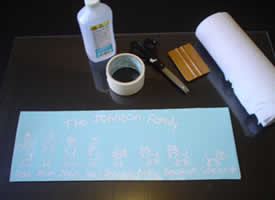
1. It's very important to clean window or surface with rubbing alcohol and apply in the shade. DO NOT apply in the sun or to hot glass. Do not apply if the tempurature outside is below 50 degrees. Also, trying the sample decal first will help if your unsure.


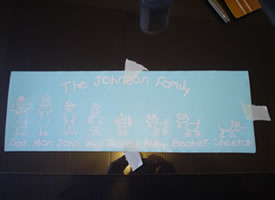
2. Tape decal to window like the picture below. Use 3 pieces of tape.
(2 in the middle, and 1 on one side as shown below.)

Exact positioning method for installing decals

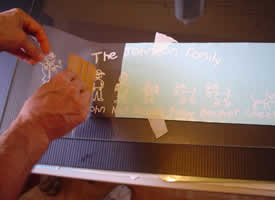
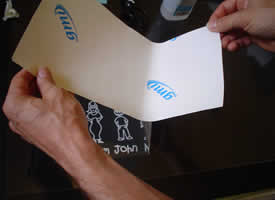
3. You will be applying half of the decal at a time. One the side you didn't tape peel back
application paper revealing the sticky side, but not past the middle 2 pieces of tape.


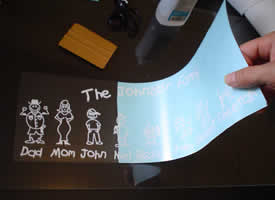
4. Cut the white paper on the back near the center (Not the top part of the sticker, just the
bottom paper) and apply that side of the decal to the window from the center out preferably
using a squeegee. This "center out method" will reduce air from being trapped and creating
those annoying air bubbles.


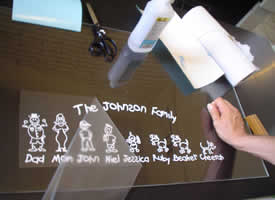
5. Now since one side is stuck you can remove the remaining pieces of tape. Go to the other
side, lift the decal up and remove the rest of the paper backing from the center out. Apply
decal from the center out as well.


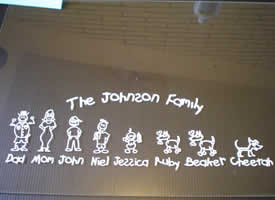
6. Now all you gotta do is remove the last layer of application tape from the window slowly
leaving only the decal cutout left on the window. Peel it slowly at a sharp angle away from
the decal.


7. Air bubbles happen. They are a normal part of this type of decal. If you would like you can try to remove them by popping them with a pin and rubbing them, but most will go away on their own. Wrinkles can usually be massaged away with a heat gun.


8. Maintenance tips: Do not over wax vehicle graphics. Using windex to clean the decals may fade them faster. Most decals will last for several years but there is no guarantee as to how long they will actually last. For much more please see the FAQ (Frequently Asked Questions)

Also see the F.A.Q. for more.


Pictures for the Exact Positioning Method
....It's Easy!

ALWAYS use patience and apply the decals in a comfortable environment.

We will use a family decal for this demonstration

1. Gather simple supplies. For this method you'll need tape, rubbing alcohol, scizzors, napkins, and a squeeqee or credit card. Clean the surface well with rubbing alcohol.

Tape Decal to surface as shown

2. Tape Decal to surface as shown using three pieces of tape as shown. Masking tape works well. Make sure you tape it excactly where you want it because that's where it will end up.

Lift and cut the wax paper

3. Peel back side without tape and cut wax paper underneath. You might want a friend to help hold the stick part so it don't fall back on the glass.

Ready to apply the first side

4. With the wax paper cut off on one side, get ready to apply half of the decal. Preferably using a squeegee or credit card applying from the center outwards to reduce air bubbles.

Squeegee the first side on

5. Apply the one side from center outwards.

Lift the second side of the sticker

6. Remove the three pieces of tape now. Lift the other side.

Peel wax paper from second side

7. Peel off wax paper backing from where you cut with the scizzors and hold the rest of the decal up and get ready to apply like you did the other side.

Squeegee on the second side

8. Squeegee the other side on as you did the first side. From the center out to reduce air bubbles.

VERY slowly peel application tape

9. Once the whole decal is applied, very slowly remove the top layer of application tape at a sharp angle from the sticker.

wow! That a great looking family sticker!

10 . Da Da!! Don't That Look Great!


Full Intensity Grafx Products and Services
Subscribe to the Full Intensity Grafx Email List
Other Graphics and Services Listings
Flames

FIND IT ON

find it on yahoo

FIND IT ON

Find Car Decals on google